Imagine you’re on a boat, in the heart of a pitch black ocean, with the cold wind howling and the sea churning. This is the situation a crew faced as one of the most defining moments of their sailing journey. Amidst these daunting conditions, they were tasked with a crucial headsail change—an endeavour that would test not just their sailing prowess but their mastery over one of the most fundamental skills in nautical navigation: knot tying.
With the crew’s experience levels varying and fatigue setting in from the overnight passage, tying a bowline, a knot known for its reliability and strength, became an unexpectedly challenging task. The whipping wind and the boat’s relentless rocking added layers of difficulty to this seemingly simple action.
The scenario unfolded with the crew needing to secure the sheets to the sail with bowlines to hoist a smaller headsail, a decision dictated by the wind’s capricious nature. Successfully tied, the bowlines held fast, a testament to their enduring reliability even in the most testing of times. Yet, as dawn broke, it was discovered that one of the windward sheets was flapping wildly in the wind— a knot had come undone, but fortune was on their side. It was the windward side that had failed, not the leeward. This stroke of luck meant avoiding what could have been a significantly more complex and potentially dangerous situation in the early hours, highlighting the paramount importance of knot proficiency.
This experience serves as a powerful reminder of the critical role that knot tying plays in sailing. It underscores not just the necessity of knowing how to tie sailing knots correctly but also the importance of being able to do so under any conditions—be it at 4 AM, amidst rough seas, or when every second counts. The incident vividly illustrates how a well-tied knot can be the thin line between safety and peril at sea.
For sailors, the art of knot tying is not just a skill to be learned; it’s an art, a practice to be perfected, a discipline that demands respect, and a knowledge that could one day make a significant difference when faced with the unpredictable nature of the sea.
Given the plethora of ropes, lines, and sheets that find their purpose across the vast expanse of a boat, the ability to tie a proper knot is not just useful—it’s absolutely critical. From securing sheets to preventing lines from slipping out of blocks, from hoisting sails to anchoring a vessel securely in place, every function aboard relies heavily on numerous well-tied knots.

This necessity stems from the fundamental role that ropes and lines play in the operation of a boat. They are the silent workers that, through the application of well-executed sailing knots, translate human intent into action—be it steering, stabilising, or speeding along the water. The efficacy of these knots directly influences a boat’s performance, its ability to withstand the rigours of the sea, and, most importantly, the safety of all aboard.
In the world of sailing, where the only constants are the wind and the water’s unpredictable whims, knot tying is a tradition passed down through generations, a critical piece of the puzzle that makes a sailor not just a passenger through the waves but a commander of their course. Thus, understanding the types, purposes, and intricacies of various knots is not just for the advancement of one’s sailing technique; it is a fundamental aspect of the craft, essential for anyone who wishes to take the helm and navigate the vast, open sea.
Navigating through the intricate world of nautical knots,
shedding light on the essential knots every sailor, whether novice or seasoned, should have in their arsenal to ensure the safety, efficiency, and integrity of every sailing expedition. By delving into the practical applications and benefits of each knot, this post aims to not only educate but also instil a deeper appreciation for the craft of knot tying within the nautical realm.
We will embark on a journey through the fundamental sailing knots that play pivotal roles across the decks of nautical vessels worldwide. Our exploration will include:
- The Bowline: Known as the “king of knots,” the Bowline forms a secure loop that will not tighten or slip under strain, making it indispensable for tasks where a quick, reliable loop is needed.
- The Clove Hitch: Essential for attaching a rope to a post, pole, or another rope quickly and securely, the Clove Hitch is a versatile knot that is both easy to tie and untie, even under tension.
- The Figure of Eight: A stopper knot that prevents ropes from running out of retaining devices, the Figure of Eight is a foundational knot that serves as the basis for many other complex knots.
- The Round Turn and Two Half Hitches: Ideal for mooring and securing lines to posts or rings, this combination of a round turn followed by two half hitches offers both security and ease of untying.
- The Reef Knot: Used to tie two ends of a single line together to bind around an object, the Reef Knot is perfect for securing objects tightly and efficiently, especially in sail reefing and tying up bundles.
Each section will cover what these knots are, where they are used, why they are useful, and provide an overview of how to tie them. Additionally, we will offer insights into effective practices for drilling these knots to proficiency. By mastering these essential knots, sailors equip themselves with the knowledge and skills necessary to tackle the myriad challenges posed by the sea with confidence and competence.
Sailing Knots – Bowline
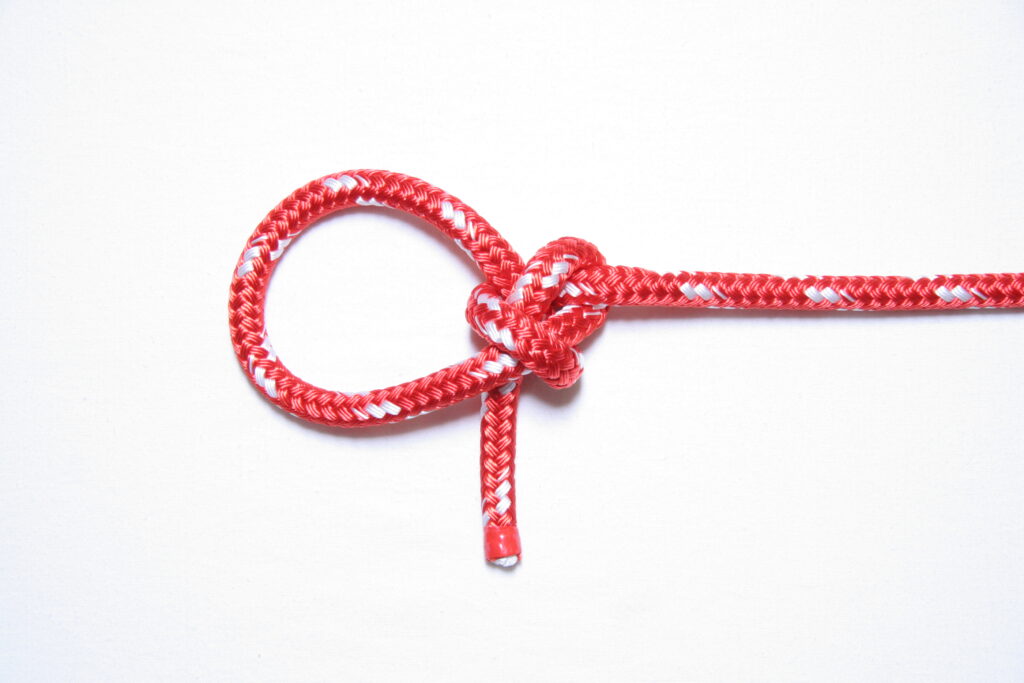
The Bowline knot is a fundamental and highly revered sailing knot in the realm of sailing and beyond, praised for its unique combination of simplicity, strength, and versatility. At its core, the Bowline creates a fixed loop at the end of a rope—a feature that sets it apart from other knots. One of its most distinctive characteristics is the knot’s ability to maintain the integrity of the loop under tension, ensuring that the loop neither slips nor enlarges. This reliability is coupled with the Bowline’s tendency to tighten under load, further securing its place as an indispensable knot in various applications.
What truly distinguishes the Bowline, however, is its enduring stability coupled with ease of untying, even after bearing significant load. This balance makes it not only a sailor’s staple but also a favourite across numerous outdoor activities and rescue operations. Its enduring legacy is summed up in the mnemonic that hints at the simplicity and effectiveness of tying this essential knot.
“the rabbit comes out of the hole, around the tree, and back into the hole,”
Within the sailing world, the Bowline knot commands a place of high regard and utility, primarily due to its reliability and the ease with which it can be both tied and untied. It’s commonly employed to fasten lines securely to various parts of the sail apparatus, such as sheets (the ropes used to control the angle of the sails to the wind) and halyards (the ropes used for hoisting sails). The Bowline’s ability to create a firm, non-slipping loop makes it exceptionally suited for these critical tasks, ensuring that sails can be adjusted swiftly and efficiently in response to changing wind conditions.
The practicality of the Bowline extends beyond its initial tying. Its design allows for quick and straightforward tying and untying, which is particularly advantageous in the dynamic and often high-pressure environment of sailing. While under load, the Bowline knot tightens, securing itself even further, which is essential during sailing when sails are under tension and the security of every knot matters. However, once the load is removed, the knot can be easily “broken” or loosened—an action often described as “breaking the back” of the Bowline. This feature ensures that the knot can be quickly untied when it’s no longer needed, without the hassle or danger of becoming jammed or excessively tight.
This balance of security under load with the ability to untie easily when not loaded is why the Bowline is so valuable in sailing. It allows sailors to make fast, efficient adjustments to their sails, adapting to the ever-changing conditions at sea with confidence that their knots will hold when needed and can be easily undone when conditions change. It’s this blend of reliability, efficiency, and practicality that cements the Bowline’s status as an indispensable tool in the sailor’s knot-tying repertoire.
Step by Step Guide
Tying a Bowline knot involves a series of straightforward steps that create a strong, reliable loop at the end of a rope. This knot’s enduring popularity in sailing and many other activities stems from its blend of simplicity and effectiveness. Here’s how to tie it:
- Create the Initial Loop: Start by forming a small loop in the rope. This is often referred to as making the “rabbit hole.” It’s important that the tail (the loose end of the rope) is on top of the standing part (the longer, secured end) when you create this loop.
- Wrap the Loose End: Take the tail (or “rabbit,” following the mnemonic) and pass it around the object you intend to secure the rope to. If you’re not tying the Bowline to an object but just creating a loop in the rope, skip this object and move to the next step.
- Pass Through the Loop: Next, bring the tail up through the loop you initially created, essentially coming up from the “rabbit hole.”
- Wrap Around the Standing Part: Now, take the tail and wrap it around the standing part of the rope, moving behind it. This step is akin to the “rabbit” going around the “tree.”
- Back Through the Loop: After wrapping the tail around the standing part, guide it back down through the loop. This move completes the path of the “rabbit” going back into its “hole.”
- Tighten the Knot: To secure the Bowline, hold the tail and the standing part of the rope with separate hands and pull them away from each other. As you do this, you can also push the loop towards the knot to help it tighten securely.
Adding a half hitch at the end of a Bowline knot is a practical modification, enhancing the knot’s security, especially when it’s not under load. This additional step addresses one of the few criticisms of the Bowline—that it can potentially untie itself under certain conditions, such as when it’s repeatedly jostled or moved without tension. By incorporating a half hitch, you ensure the knot remains secure even in the absence of load, making it even more reliable for a variety of uses. This simple yet effective addition not only secures the Bowline against unintended loosening but also retains the ease of untying characteristic of the Bowline when the extra security is no longer needed. The half hitch does not compromise the integrity or the load-bearing capacity of the original knot but instead complements it, making it suitable for an even wider range of applications where the security of the knot is paramount.We’ll go through the step by step guide for half hitches in the section Round Turn and Two Half Hitches.
The Bowline’s versatility is evident in its ability to create a loop that neither slips nor jams, making it incredibly useful for a multitude of applications. Its ease of untying, even after being under significant load, adds to its practicality. Whether you’re securing sails, setting up a campsite, or even performing rescue operations, mastering the Bowline knot is a valuable skill that combines efficiency, reliability, and ease in one package.
Mastering the Bowline knot is a fundamental skill for anyone involved in sailing, climbing, or any activity where rope work is essential. Here are some tips and tricks for quickly learning this knot, as well as common mistakes to avoid:
Tips for Mastery
- Practice Regularly: Like any skill, proficiency in tying a Bowline comes with practice. Regularly practicing the knot will help commit the steps to muscle memory, allowing you to tie it more quickly and efficiently.
- Use Visual Aids: Many people find it helpful to visualize the Bowline’s steps as the “rabbit coming out of the hole, around the tree, and back into the hole.” Use whatever imagery works best for you.
- Practice in Different Conditions: Try tying the Bowline with different types and thicknesses of rope and in various conditions (wet, cold, windy) to simulate real-life scenarios where you might need to tie this knot.
Common Mistakes to Avoid
- Incorrect Tail Direction: A common mistake is passing the tail through the loop in the wrong direction. Ensure the tail comes up through the loop, around the standing part, and back down through the loop. If tied incorrectly, the knot may fail under load.
- Insufficient Tightening: Ensure the knot is properly tightened. A loosely tied Bowline is more likely to come undone or slip.
- Forgetting the Safety Half Hitch: Especially when the knot will be under a variable load or none at all, adding a half hitch with the tail around the standing part can prevent accidental loosening.
Advanced Practice: One-Handed Bowline
As a dinghy sailing instructor, an advanced technique we drilled was tying the Bowline one-handed. This skill is incredibly useful in situations where you might only have one hand free, such as when holding onto a boat or a safety line.
Sailing Knots – Clove Hitch
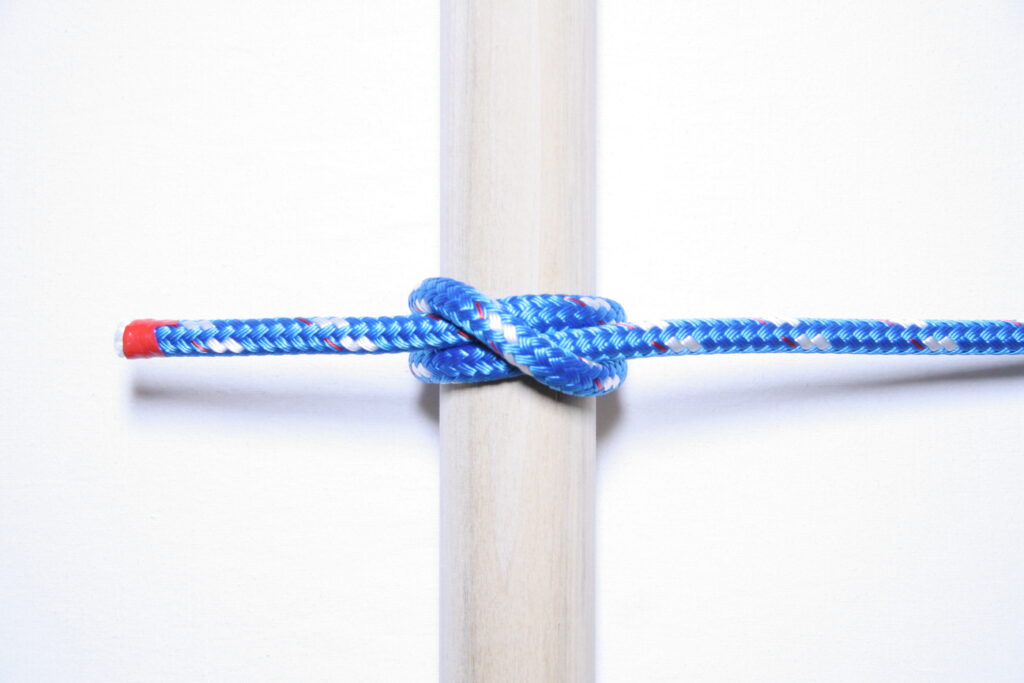
The Clove Hitch is a versatile and straightforward sailing knot, historically common in sailing and many other rope-related activities. It serves to temporarily secure a length of rope around an object, such as a post, pole, or another rope. The knot consists of two successive half-hitches around the object, each wrapped in opposite directions, which lock together under tension to hold the rope in place.
Despite its simplicity and utility, the Clove Hitch has seen a decline in popularity within the sailing community, largely due to a couple of significant drawbacks. One issue is its tendency to slip, especially when applied on smooth surfaces or under variable loads. This slippage can compromise the knot’s reliability as a means of securing important gear or components on a boat.
Another concern with the Clove Hitch is related to its adjustment and release. While adding half hitches to the knot, similar to the practice with a Bowline, can secure it further, this can also lead to the knot tightening under tension to a degree where it becomes extremely difficult, if not impossible, to untie. This characteristic limits the Clove Hitch’s functionality in situations where a secure, yet readily releasable, knot is required.
The Clove Hitch retains its usefulness in scenarios where a quick, temporary knot is needed. Its ease of tying and untying, even when under moderate tension, makes it suitable for applications where the rope needs to be attached or removed swiftly and without much fuss. For example, it can be employed effectively to start or finish lashings, secure fenders to a boat temporarily, or as a stopgap measure until a more permanent and reliable knot can be applied. Its utility, therefore, lies in its simplicity and the speed with which it can be employed, rather than its long-term reliability or security under heavy load.
The Clove Hitch finds its niche in the sailing world as a convenient knot for securing temporary fenders while coming alongside or slipping from a dock. This specific application underscores the knot’s key attributes: ease of tying and untying, and adequacy for temporary tasks where a quick adjustment or release might be necessary.
Fenders, which act as cushions to protect the boat’s sides from rubbing against docks, other boats, or any hard surface, are essential when docking or mooring. The need for quick deployment and adjustment of fenders is common, as the positioning and number of fenders used can depend on various factors like the docking configuration, tidal changes, or the presence of neighboring vessels. The Clove Hitch, with its simple structure, allows sailors to swiftly attach fenders to the boat at the desired height and position. Its ability to be easily untied even after bearing the weight of the fender against the boat or dock makes it an ideal choice for this purpose.
While the Clove Hitch may not be the go-to knot for all sailing applications due to its limitations, such as slipping under certain conditions and the potential difficulty in untying when excessively tightened, it perfectly suits scenarios requiring temporary, adjustable fastenings. Thus, for the specific task of securing fenders during docking maneuvers, the Clove Hitch remains a practical and valuable tool in a sailor’s repertoire, demonstrating that even the simplest knots have their place and purpose on the water.
Step by Step Guide
Tying a Clove Hitch is a straightforward process that can be quickly mastered with a bit of practice. This knot is especially useful for temporary tasks like securing fenders to a boat when docking. Here’s a step-by-step guide to tying a Clove Hitch around a post, pole, or similar object:
- Make the First Loop: Begin by holding the end of the rope (the tail) and wrapping it around the object (e.g., a pole, railing, or post) you wish to tie the knot around. This action creates the first loop around the object. Ensure the tail crosses over the standing part of the rope (the longer section leading to the rest of the rope).
- Step 2: Create a Second Loop: Continue to bring the tail around the object to form a second loop. This time, make sure this second loop is laid in front of the first loop you created. Essentially, you’re wrapping the rope around the object again, but the second loop should be closer to you than the first.
- Step 3: Pass the Tail Underneath the First Loop: Now, take the tail of the rope and pass it underneath the first loop you created. To clarify, you’re not passing it under the loop you just made (the second one), but the initial loop that’s now sitting behind the second loop.
- Step 4: Tighten the Knot: Once the tail is passed underneath, you should see the form of the Clove Hitch beginning to take shape. To secure the knot, pull on both the tail and the standing part of the rope while holding the loops against the object. The goal is to tighten the loops so they snugly wrap around the object, with the tail end secured under the first loop.
- Step 5: Adjust as Needed: After tightening, you may need to adjust the Clove Hitch slightly to ensure it’s snug and properly positioned around the object. The knot should have two parallel loops around the object, with the tail passing under the first loop in a way that locks everything in place.
The Clove Hitch is valued for its simplicity and ease of untying, making it an ideal choice for temporary uses where the knot needs to be removed or adjusted quickly. While it may not be the most secure knot for all situations due to its potential to slip under heavy loads or when not under tension, its utility in scenarios like attaching fenders during docking makes it a useful knot to have in your repertoire.
Mastering the Clove Hitch comes with its own set of nuances that can help you get the most out of this versatile yet sometimes tricky knot. Here are some insights on how to tie it effectively, along with tips on common pitfalls to avoid:
Tips for Mastery
- Use for Temporary Situations: The Clove Hitch is best suited for temporary applications, such as quickly securing fenders or lines where quick adjustment or release is necessary. Its ease of tying and untying makes it ideal for these scenarios.
- Maintain Tension: If using a Clove Hitch, ensure that there’s constant tension on the line. The Clove Hitch can slip if the load is uneven or if the object it’s tied to is too smooth. Continuous tension helps maintain the knot’s integrity.
- Practice on Different Objects: Gain proficiency with the Clove Hitch by practicing on various objects of different sizes and materials. This practice will help you understand how the knot behaves under different conditions and how to adjust it for security.
What Not to Do
- Avoid Using as a Permanent Solution: Due to its tendency to slip under certain conditions and its potential to tighten excessively, making it difficult to untie, the Clove Hitch should not be used where a permanent, secure knot is required.
- Refrain from Adding Half Hitches: Unlike the Bowline, where adding a half hitch can secure the knot without impacting its ease of untying, adding half hitches to a Clove Hitch can complicate its removal. This is especially important to remember in situations where the knot may need to be untied quickly or under tension.
- Consider Alternatives for Critical Applications: For situations where more security and reliability are needed, consider using a Round Turn and Two Half Hitches instead. This knot offers similar functionality but with increased stability and security. It takes slightly longer to tie but is worth the extra effort for its dependability.
Alternatives
- Round Turn and Two Half Hitches: This is an excellent alternative to the Clove Hitch when time is not of the essence. It provides a secure hold that is less prone to slipping and can be untied more easily than a Clove Hitch that has tightened under load.
Understanding these tips and precautions can significantly enhance your knot-tying skill set, allowing you to choose the most appropriate knot for any given situation. The Clove Hitch, with its quick tying and untying ability, remains a valuable knot in many temporary applications, provided its limitations are well understood and respected.
Figure of Eight
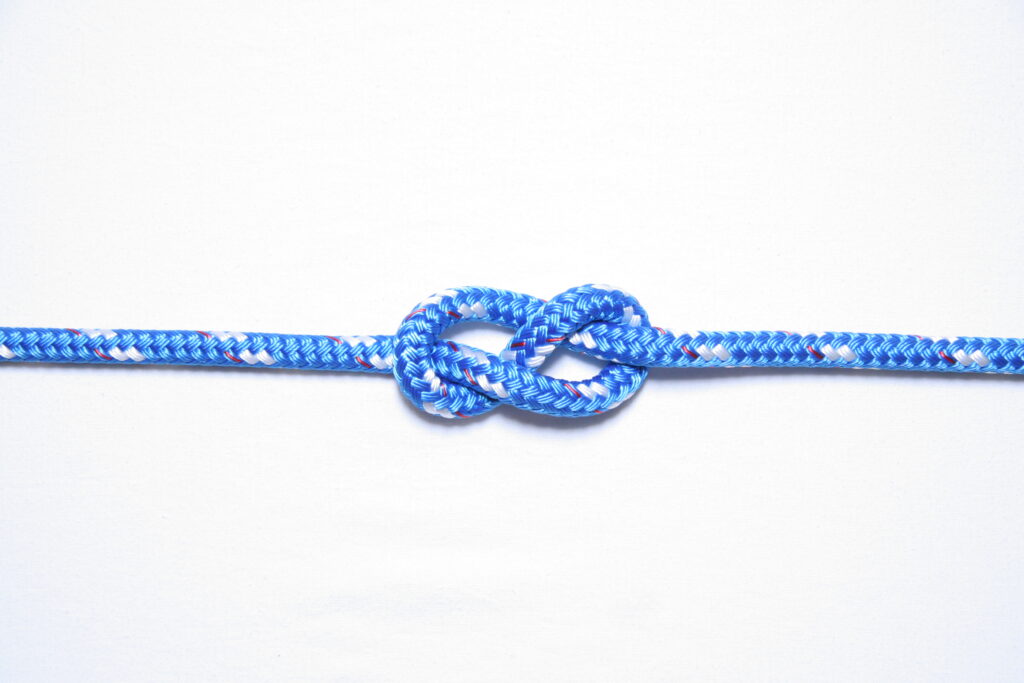
The Figure of Eight sailing knot, distinguished by its namesake shape, offers a blend of simplicity, efficiency, and reliability that sets it apart from other knots. Its primary role as a stopper knot is crucial in various settings, particularly in sailing, where it prevents lines from inadvertently sliding out of sight or up inside a mast. This functionality is vital for maintaining smooth and safe sailing operations, ensuring that ropes and lines remain accessible and manageable at all times.
One of the key virtues of the Figure of Eight knot is its ease of untying. Even after being jammed tightly against a block or pulley, it does not bind in the same way that some knots do, allowing for quick adjustments or releases without significant effort. This characteristic is particularly advantageous in dynamic marine environments where conditions can change rapidly, and the ability to quickly modify rigging can be essential.
The very feature that makes the Figure of Eight so appealing—its ease of untying—can also serve as a drawback in certain situations. There exists a potential for the knot to come undone, especially if it’s not under constant tension or if it’s subjected to repeated jostling or rubbing against objects. This tendency means that while the Figure of Eight is an excellent choice for temporary stoppages or situations where quick release is a benefit, it may not be the best option where a more permanent, secure solution is required.
Despite this occasional vice, the Figure of Eight knot remains a favorite for its straightforward tying process, its effective stopping power, and its ability to be untied easily after bearing load. Whether used at sea to prevent ropes from disappearing into the mast or in climbing to secure equipment, the Figure of Eight knot is a versatile tool in the knot-tyer’s arsenal, exemplifying a perfect balance between utility and convenience.
In the sailing world, the Figure of Eight knot finds its place as an indispensable tool, primarily utilized at the ends of ropes to ensure safety and efficiency onboard. Its applications are both varied and critical, underscoring its utility across a wide range of sailing operations. Here’s how the Figure of Eight knot is employed in sailing contexts:
At the End of Sheets: One common application of the Figure of Eight knot is at the end of sheets—the ropes used to control the angle of the sails relative to the wind. By tying this knot at the tail end of a sheet, sailors can prevent the rope from inadvertently slipping out of blocks and pulleys. This is particularly important during maneuvers or in heavy weather when a loose sheet flapping out of control can pose a significant hazard to the crew and the efficiency of sail handling.
Preventing Rope Loss in the Mast: Another critical use of the Figure of Eight knot is on halyards, the ropes responsible for hoisting sails. Tying a Figure of Eight knot at the end of a halyard prevents the rope from being pulled or slipping back into the mast. Losing the end of a halyard inside the mast can lead to complex and time-consuming retrieval operations, potentially compromising the sailing performance and safety. The Figure of Eight knot acts as a simple yet effective safeguard against such scenarios.
Beyond its specific applications on sheets and halyards, the Figure of Eight knot serves as a general-purpose stopper knot in various other sailing applications. Its ease of tying makes it a go-to choice for quickly securing the ends of any ropes onboard to prevent them from running through gear unchecked. This can include anything from spinnaker sheets to reefing lines, where having a reliable stopper knot ensures operational safety and prevents equipment loss or damage.
The Figure of Eight knot’s versatility, coupled with its ease of untying even after load application, makes it a valuable knot for sailors. Whether preventing gear mishaps, ensuring the accessibility of critical lines, or simply keeping the deck orderly, the Figure of Eight knot’s applications in sailing are as essential as they are varied, highlighting its enduring relevance in the nautical realm.
Step by Step Guide
Tying a Figure of Eight knot is a straightforward process that can be quickly learned and applied in various situations. Here’s a step-by-step guide to tying this versatile stopper knot:
- Step 1: Make a Loop: Begin by taking the end of the rope in hand. Create a loop by passing the tail (the end of the rope) over the standing part (the longer section of rope that extends to the rest of the coil or to what the rope is attached).
- Step 2: Wrap the Tail Around: With the loop formed, bring the tail around the standing part of the rope so that it passes behind and then over the standing part. This action creates a larger loop with the tail laying over the top of the standing part.
- Step 3: Thread the Tail Through the Loop: Next, thread the tail down through the loop you initially made in Step 1. The tail should enter the loop from the top and emerge on the other side, effectively making a figure-eight pattern.
- Step 4: Tighten the Knot: Hold the tail with one hand and the standing part of the rope with the other. Gently pull both ends while ensuring the loops of the figure eight remain neatly arranged. Tighten until the knot is snug and the shape of the figure eight is clearly defined and stable.
Tips for Tying the Figure of Eight:
- Practice for Perfection: The elegance of the Figure of Eight lies in its simplicity, but achieving the perfect form requires practice. Regularly practicing this knot will help ensure it is tied correctly under any circumstances.
- Ensure Proper Tension: One key to the Figure of Eight’s effectiveness is maintaining appropriate tension on the rope. This knot can shake loose if not under constant tension, so it’s crucial to check the knot periodically if it’s being used over an extended period.
- Visual Inspection: Due to its distinct shape, the Figure of Eight knot is easily inspected for correctness. Always take a moment to visually confirm that the knot has been tied properly, looking for the characteristic ‘8’ shape.
- Practice for Speed: With practice, you can tie the Figure of Eight quickly and efficiently, making it a reliable stopper knot for various uses.
- Check the Knot: Before relying on the Figure of Eight in a critical situation, double-check the knot to ensure it’s been tied correctly. A properly tied Figure of Eight will not slip under load but is still relatively easy to untie when necessary.
Common Pitfalls and How to Avoid Them
- Shaking Loose: The Figure of Eight can come undone if the rope vibrates or moves back and forth without load. To mitigate this, ensure the knot is tightly secured and check it regularly, especially in situations where the rope may experience intermittent tension.
- Not Suitable for All Situations: While the Figure of Eight is versatile, it’s not the best fit for every scenario, particularly where a permanent or highly secure stopper knot is required. For critical applications, consider using more specialized knots that are designed to handle specific loads or conditions.
- Alternative Knots for Permanent Solutions: For situations requiring a more secure and permanent solution, explore other stopper knots or combinations of knots that offer increased security and are less likely to loosen over time. The Double Overhand Stopper Knot, for example, provides a more substantial stopper at the end of a rope but is more challenging to untie.
Embrace Its Simplicity
- Suitable for Short-term or Non-critical Purposes: The Figure of Eight shines in its ease of tying and untying, making it ideal for short-term use or in scenarios where quick adjustments are necessary. Its straightforward design also makes it a great educational tool for those new to knot tying.
By understanding these tips and being mindful of the Figure of Eight knot’s limitations, one can effectively incorporate this knot into their repertoire, appreciating its simplicity and convenience for a wide range of applications. Whether used in sailing, climbing, or casual rope work, the Figure of Eight remains a fundamental skill, embodying the principle that sometimes, simplicity is the ultimate sophistication.
Round Turn and Two Half Hitches

The Round Turn and Two Half Hitches is indeed a knot that builds on the basic principles of the Clove Hitch but with enhanced stability and security, making it a preferred choice for many applications where a rope needs to be securely tied to an object. Its design addresses and mitigates some of the primary drawbacks associated with the Clove Hitch, providing a more reliable solution in various contexts.
Unique Characteristics
- Increased Stability: The initial round turn (wrapping the rope around the object twice) provides extra friction and grip, significantly reducing the likelihood of the knot shaking loose under vibration or changing loads. This stability is especially valuable in environments where conditions can fluctuate, such as at sea or in outdoor settings.
- Ease of Untying: Despite its secure hold, one of the remarkable features of this knot is its ability to be untied with relative ease, even after being under significant tension. This contrasts with many other knots that can tighten under load, making them difficult to release without resorting to cutting the rope.
Purpose and Applications
In the context of sailing, the Round Turn and Two Half Hitches knot proves to be exceptionally valuable, particularly for tasks requiring a combination of security and reliability, such as securing more permanent fenders. Fenders play a critical role in protecting the boat’s hull from damage when moored against docks, jetties, or other vessels. The need for fenders to stay securely in place, often for extended periods, highlights the importance of using a knot that can be relied upon to maintain its hold under varying conditions.
While the Clove Hitch serves well for quick, temporary attachments, its tendency to slip under certain conditions and difficulty in untying under load can be problematic. The Round Turn and Two Half Hitches addresses these issues through its design, offering a more secure alternative that remains manageable. This knot’s ability to stay firmly in place without tightening excessively makes it a superior choice for situations requiring both reliability and ease of adjustment or removal.
Step by Step Guide
Step 1: Make a Round Turn
- Begin by passing the end of the rope around the object (e.g., a post or ring) to which you want to attach the rope. This is the first part of the round turn.
- Continue by bringing the rope around the object a second time, following the same path as the first wrap. This completes the round turn, which adds friction and security, helping to prevent the rope from slipping.
Step 2: Start the First Half Hitch
- After completing the round turn, bring the tail (the end of the rope) over the standing part (the long section of the rope leading away from the object) to start forming the first half hitch.
- Pass the tail under the standing part and then through the loop that has just been formed. This is your first half hitch.
Step 3: Complete the Second Half Hitch
- To start the second half hitch, again bring the tail over the standing part of the rope, similar to how you began the first half hitch.
- Pass the tail under the standing part and then through the loop formed, just like the first half hitch. Pull the tail to tighten the second half hitch against the first one.
Step 4: Tighten and Secure the Knot
- Once both half hitches are in place, pull on the tail and the standing part of the rope in opposite directions to tighten the knot securely.
- Ensure that the round turn is snug around the object and that both half hitches are tight and sitting neatly against each other.
Tips for Success
- Ensure Snugness: After tying the round turn, make sure it’s snug around the object to maximize friction and prevent slippage.
- Consistent Direction: When forming the half hitches, ensure they are tied in the same direction to maintain the knot’s integrity and appearance.
- Regular Checks: Especially if the knot is bearing load over time, periodically check and tighten the half hitches as necessary to maintain security.
The Round Turn and Two Half Hitches is a versatile and reliable knot, ideal for securing ropes to objects in situations where stability is crucial, yet easy release is also valued. Whether you’re mooring a boat, setting up camp, or securing cargo, mastering this knot will serve you well across a wide range of activities.
Reef Knot
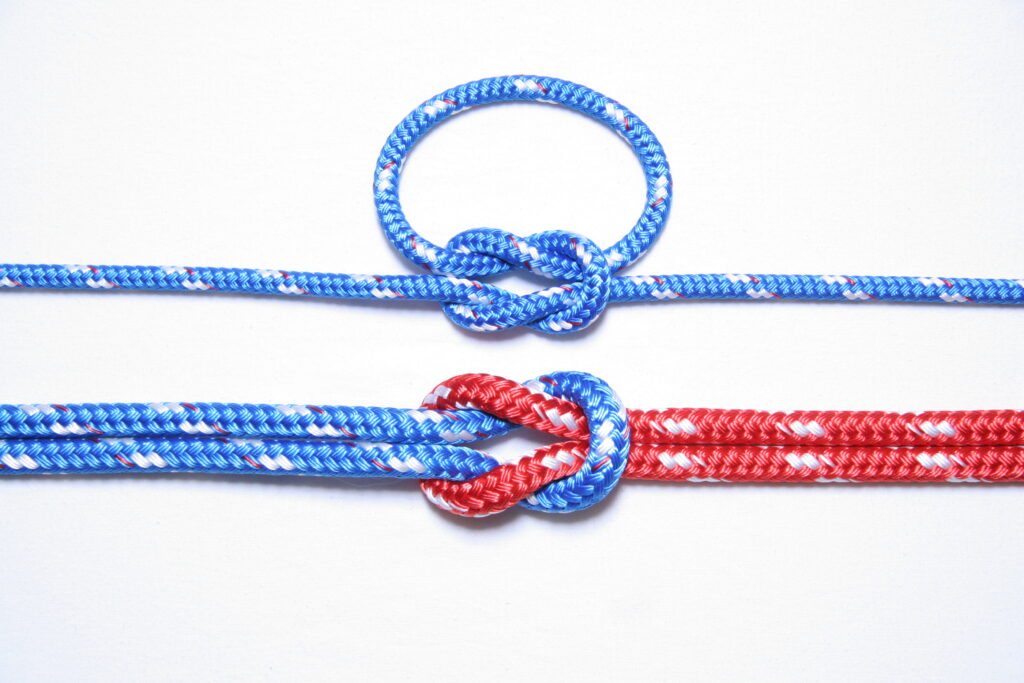
The Reef Knot, also known as the Square Knot, is a classic binding knot renowned for its simplicity and effectiveness in tying two ends of a single rope together or joining two ropes of equal diameter. Its history is deeply intertwined with maritime tradition, where it was predominantly used to secure the reef points in sails for adjusting sail area in response to wind conditions. This historical application underpins the knot’s name and highlights its importance in nautical operations.
Properties of the Reef Knot:
- Symmetry and Balance: The Reef Knot is characterized by its symmetrical shape, which ensures that the load is evenly distributed across the knot. This symmetry is crucial for maintaining the knot’s integrity and prevents it from slipping under normal conditions.
- Ease of Tying and Untying: One of the most valued properties of the Reef Knot is its straightforward tying process, which can be quickly learned and executed. Equally important is its ability to be untied with ease, even after being subjected to a load. This feature makes it particularly useful in situations where quick release of the knot is necessary.
- Temporary Binding: The Reef Knot is best suited for temporary or non-critical applications. It excels in tasks requiring the temporary joining of two ropes or the binding of objects where quick access or release might be needed later.
- Limitations Under Unequal Loads: While the Reef Knot is reliable under uniform tension, it can slip or come undone when subjected to unequal loads or when used with ropes of differing diameters or materials. This limitation underscores the importance of using the Reef Knot appropriately and understanding its suitable applications.
Applications of the reef knot:
In modern usage, the Reef Knot is versatile, finding applications beyond the maritime world. It is commonly used in camping to tie equipment, in first aid to secure bandages, and in everyday tasks requiring the temporary binding of materials. However, its utility in critical load-bearing applications is limited due to the potential for slippage under uneven tension.
In the context of sailing, the Reef Knot serves a pivotal role, particularly in the practice of reefing sails. Reefing is the process of reducing the area of a sail without actually changing it, which is essential in strong wind conditions to maintain control and balance of the boat. The Reef Knot is employed to secure the reefing lines—ropes used to tie up the excess sail material after it has been gathered or folded to lessen the sail’s surface area.
Key Aspects of the Reef Knot in Sailing:
- Securing Reef Points: After the sail has been reefed, the Reef Knot is used to tie the reef points (small ropes or ties located along the sail) around the gathered sail material. This secures the reduced sail area, ensuring the sail functions efficiently in stronger winds.
- Ease of Release: One of the most significant advantages of using the Reef Knot for reefing lines is its ease of untying. When the wind conditions calm down, and it becomes safe to increase the sail area again, the Reef Knots can be quickly and easily untied, allowing the sail to be shaken out to its full size. This quick adjustability is crucial for effective sail management.
- Reliability Under Uniform Tension: In the context of reefing, the Reef Knot is subject to relatively uniform tension, which suits its properties well. This uniformity minimizes the risk of the knot slipping or coming undone unintentionally, making it a reliable choice for this specific sailing task.
Limitations and Considerations:
While the Reef Knot is highly valued for its simplicity and functionality in reefing sails, sailors must be mindful of its limitations. It is not designed to bear heavy loads or to join ropes of different diameters or materials, where unequal tension could cause the knot to slip or fail. In sailing, its use is therefore mostly confined to situations where these conditions are met, such as in the secure but temporary binding of reefing lines.
The continued use of the Reef Knot in sailing for reefing purposes underscores its practical utility and the importance of selecting the right knot for the task at hand. By understanding the characteristics and applications of various knots, sailors can ensure their vessels are both safe and efficiently managed, regardless of the conditions they face.
The Reef Knot’s enduring popularity lies in its combination of simplicity, efficiency, and the practical ease with which it can be managed. While it may not be suited for all tying needs, its role in facilitating quick and effective temporary bindings continues to make it a valuable knot in various scenarios.
Step by Step Guide
- Step 1: Hold the Ends: Start with the two ends of the rope or lines you wish to join. If you’re tying a reef in a sail, these will be the two ends of the reefing line or the two parts of the sail you need to secure together.
- Step 2: Cross and Loop: Cross the right end over the left end, then bring it underneath the left end. This is similar to the first part of tying your shoelaces.
- Step 3: Cross Again: Now take what is now the left end (previously the right end) and cross it over the right end (previously the left end).
- Step 4: Loop and Pull Through: Bring the left end underneath the right end again, just as you did in the first loop, but in the opposite direction.
- Step 5: Tighten the Knot: Hold both ends of the rope and pull them in opposite directions to tighten the knot. The Reef Knot should appear symmetrical with both loops and ends evenly sized.
Tips for a Successful Reef Knot
- Ensure Symmetry: The beauty of a properly tied Reef Knot is in its symmetry. Make sure both the initial cross and the second cross are tied in the same way to maintain balance in the knot.
- Check the Knot: A correctly tied Reef Knot will have its ends lying parallel to each other, not perpendicular. If the ends are perpendicular, you’ve likely tied a Granny Knot, which is not as secure.
- Practice for Proficiency: While the Reef Knot is simple, practicing it will ensure you can tie it quickly and correctly when needed, especially in conditions where dexterity may be challenged, such as on a moving boat or in bad weather.
- Use for Appropriate Tasks: Remember, the Reef Knot is great for tying two ends of equal thickness and is intended for temporary or non-critical uses due to its potential to slip under uneven loads.
By following these steps and tips, you can master the Reef Knot, a versatile and handy knot for everyday tasks and essential for adjusting sail areas through reefing in sailing. Its balance of simplicity and functionality makes it a valuable knot to know for anyone spending time on or around the water.
Final Thoughts
Mastering the art of knot tying is not just a skill but a fundamental aspect of sailing that enhances both safety and efficiency on the water. Each knot, with its unique properties and applications, serves a specific purpose that contributes significantly to the operation of a sailing vessel.
- The Bowline is celebrated for its reliability in forming a secure loop that doesn’t slip under tension, making it indispensable for attaching sails to sheets or for any application where a strong loop is required.
- The Clove Hitch offers simplicity and speed in tying, ideal for temporary tasks like securing fenders or quick moorings, despite its limitations in load-bearing situations.
- The Figure of Eight acts as an effective stopper knot, preventing ropes from running through pulleys and ensuring lines remain where they’re needed.
- The Round Turn and Two Half Hitches builds on the Clove Hitch by providing added security and stability, perfect for mooring and securing more permanent fixtures.
- The Reef Knot excels in tying two ends of a rope together for temporary bindings, crucial for adjusting sail areas through reefing, offering easy untie capability even under load.
Each of these knots plays a pivotal role in the myriad tasks involved in sailing, from the mundane to the critical. Proficiency in these knots not only ensures that these tasks are performed more efficiently but also enhances safety onboard, as well-prepared sailors can respond more effectively to the dynamic conditions at sea.
I encourage all sailors, whether seasoned veterans or those new to the helm, to practice these knots regularly. Familiarity and proficiency with these knots can profoundly impact your sailing experience, offering not just improved safety and efficiency but also a deeper connection to the centuries-old traditions of seamanship.
I invite you, the readers, to share your experiences with these essential knots. Have you found particular knots more useful in your sailing adventures? Do you have additional tips for mastering these knots or perhaps suggestions for other knots that you consider essential? Your insights and stories not only enrich our shared knowledge but also foster a community of skilled and prepared sailors. Please, share your thoughts and let’s continue to learn from each other.
Additional Resources
- The International Maritime Organization (IMO)
- Look for safety guidelines and publications related to sailing and knot tying.
- Royal Yachting Association (RYA)
- The RYA offers a wealth of resources on sailing techniques, including detailed guides on knot tying.
- Animated Knots by Grog
- A highly visual and informative website dedicated to knot tying, with step-by-step instructions and animations for a wide variety of knots.
- The American Sailing Association (ASA)
- Offers educational materials and articles on all aspects of sailing, including seamanship and knot tying.
- Sail Magazine
- Frequently publishes articles and tutorials on sailing skills, including knot tying.
- Practical Sailor
- Known for equipment reviews and practical sailing advice, including knot usage and safety tips